Understanding Your Camera Settings: There’s More To Taking Pictures Than The ‘Auto’ Function
Published: January 10, 2013It is inevitable. Many people who buy a DSLR (digital single lens reflex) camera is going to think they’re a ‘photographer’. Which, hey, that’s fine. Everyone needs a hobby. But, if you own a DSLR camera, then take the time to learn how to take your camera off of the “auto” setting and do a little bit more. Understanding your camera settings will make you a better photographer.
Modern DSLR cameras have an “M” function, meaning MANUAL, as well as many other features that would also be considered automatic in some form or another. The important thing to know here is that once you learn how Manual works, the possibilities are endless for your photos.
A DSLR camera is what photographers like to call “what you see is what you get.” By this, we mean that when you look through your viewfinder, the image is not going to be flipped, parts aren’t going to be cropped, and everything you see in your viewfinder (along with focusing) is exactly what your picture will look like.
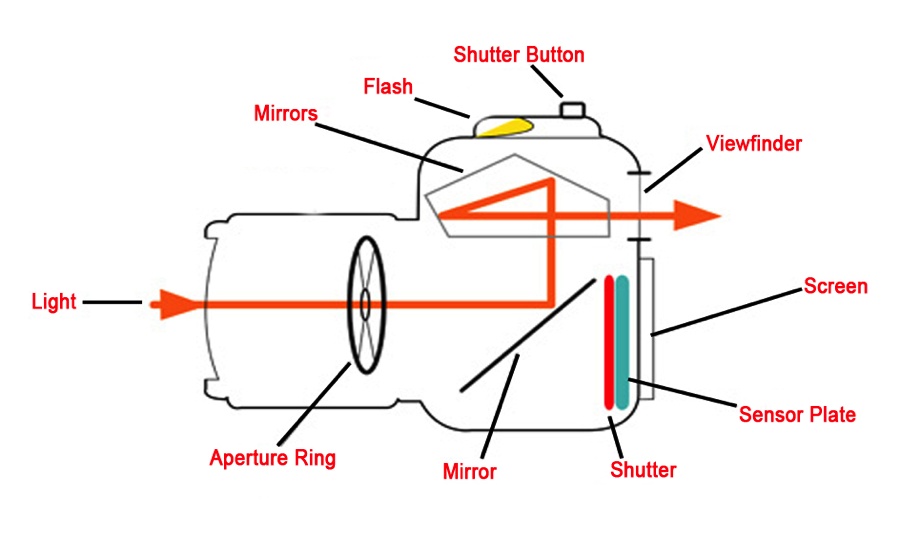
This diagram illustrates how light is refracted inside the camera, and shows where the parts are located. To see what a picture will look like with different lighting, a lot of newer cameras have a screen to view exactly how the image will turn out with certain lighting. However, this feature does not account for shakiness on slower shutter speeds.
While looking through your viewfinder, there will be a digital exposure compensation meter. This meter will tell you if your picture will turn out too dark or too bright, so you have a good understanding of what it will turn out like before you snap your photo. Here is a look at what is on your DSLR screen:
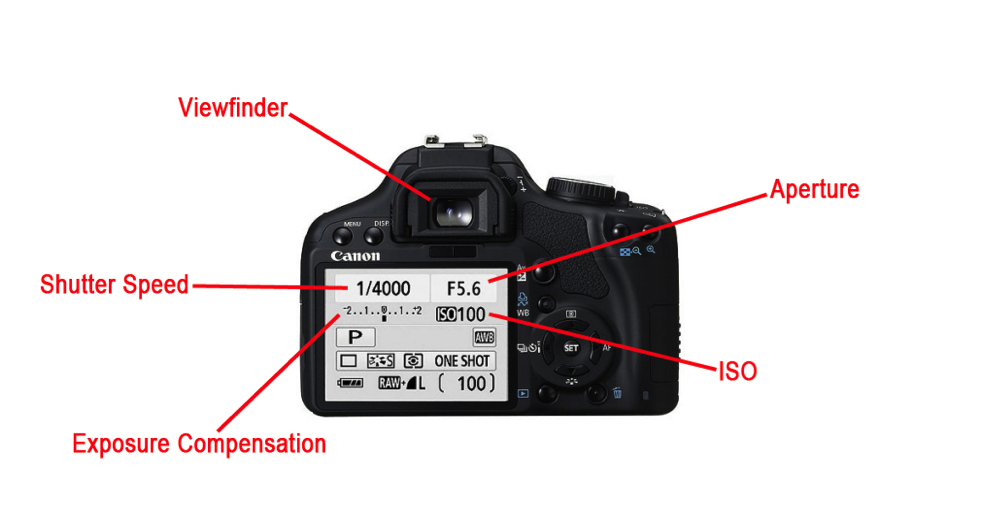
All of these: aperture, shutter speed, ISO speed, etc. are things to pay close attention to when you are out shooting.
Shutter speed is exactly what you would think it is; how fast the shutter closes to snap a shot. The speed of your shutter determines how much light is let into your picture. For example, the shutter speed on the diagram is 1/4000. This indicates that the shutter is going to close in 1/4000th of a second. That is very fast. However, if you turn that speed down to, say, 1/100th of a second, it would close slower. The 1/4000 speed will let in a lot less light than the 1/100th of a second speed. But, the 1/4000 will take a picture with less blur and a crisper photo. If something was moving really quick and you wanted to capture anything other than a blur, it is good to make that shutter fast. Spend some time experimenting with shutter speeds to start to learn how you can adjust for the best photos.
The aperture is size of the opening of the lens. In our example, the aperture is F5.6, which is pretty open, letting in the most possible light. An F22 aperture would be a smaller opening, letting in less light but giving a higher depth of field.
Another feature to consider if you want a faster shutter speed is the ISO. The ISO speed can go down to 100, which is best for bright places. Use a higher ISO for darker areas (on the newer cameras you can go up to 3200-6400). It may sound a little complicated at first, but once you get used to it, you will never use ‘auto’ again!
You’ll notice that for most cameras, ‘M’ by default turns off the flash. This is a GOOD thing. Flash can completely ruin pictures. If portraits are too dark, it is wise to get some ambient light (I have even used household lamps). It just makes for a better, more realistic photo, compared to some flash photos where everyone has scary red eye.
These are just the basics; hopefully you can begin to experiment on your own with that new DSLR camera. Understanding and using the manual settings on your camera makes photography much more experimental and enjoyable.
Need more help capturing that perfect shot? Get in touch!